CadStd Tutorial Chapter 5
Creating Isometric Projections
Note: This function is only available in CadStd Pro.
1. Open the drawing
isostart.cad using CadStd Pro, or create an
orthographic drawing from the isometric drawing shown in step 8 as part of a more challenging exercise.
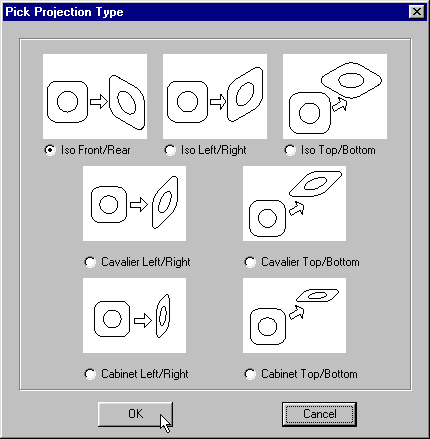
2. Bring up the
Projection Dialog Box by doing an
Edit/Project, or use the

icon located in the
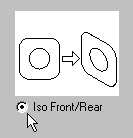
Edit Options section. When the dialog box appears select
Iso Front/Rear and press OK.
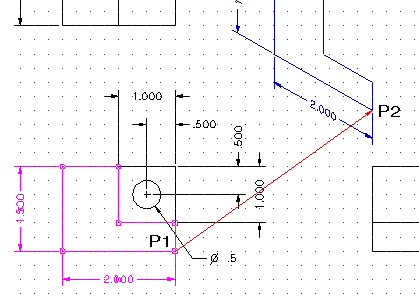
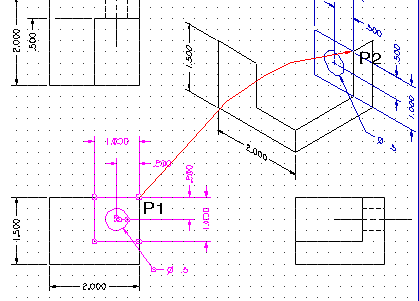
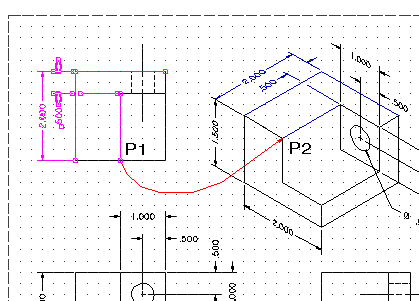
3. Select the entities that are shown and press the right mouse button. Press the
left mouse button (on the grid point at the P1 end of the red arrow), followed by the point
at P2 (The results are shown in blue).
4.Bring up the
Projection Dialog Box again by using the right mouse button to repeat the last command, or by doing an
Edit/Project, or use the
icon located in the
Edit Options section.
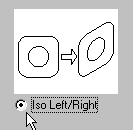
When the dialog box appears select
Iso Left/Right and press OK.
Select the entities that are shown and press the right mouse button. Press the
left mouse button (on the grid point at the P1 end of the red arrow), followed by the point
at P2.

5. Bring up the
Projection Dialog Box again by using the right mouse button to repeat the last command, or by
doing an
Edit/Project, or use the
icon located in the
Edit Options section.
When the dialog box appears select
Iso Front/Rear and press OK.
Select the entities that are shown and press the right mouse button. Press the
left mouse button (on the grid point at the P1 end of the red arrow).
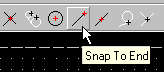
Make sure to click on the snap end icon before picking the line near P2 since this end
is not on grid.
6. Bring up the
Projection Dialog Box again by using the right mouse button to repeat the last command, or by
doing an
Edit/Project or use the
icon located in the
Edit Options section.
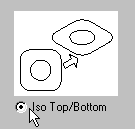
When the dialog box appears select
Iso Left/Right and press OK.
Select the entities that are shown and press the right mouse button. Press the
left mouse button (on the grid point at the P1 end of the red arrow).
Make sure to click on the
snap end icon before picking the line near P2 since this end
is not on grid.
7. Bring up the
Grid Settings Dialog Box by
doing an
Settings/Grid, or use the

icon located in the
Settings section.
Set the pulldown to
"On (Isometric Left/Right)",
Press the "Offset" button and click on the
snap end icon before picking an end point on the
isometric drawing. This will align the grid to enable you to draw a new line directly on the
isometric view.

8.Finish the drawing by adding the line shown here in blue.
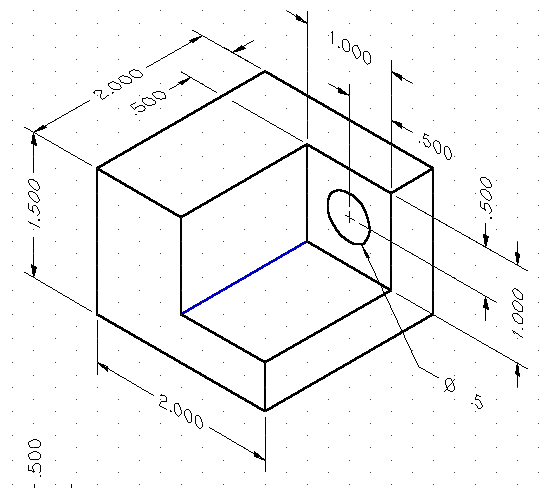
Since this isometric view is at the same scale as the orthographic view, it is technically called
an
isometric drawing. To create a true isometric projection scale all the entities
in the isometric view by 0.816 using the
Edit / Scale command.
You may view a finished sample isometric drawing by opening the drawing
isodraw.cad.
To view a finished sample isometric projection see
isoproj.cad.
[Main Index]
End of tutorial "Creating Isometric Projections".
Copyright 2000-2016, John Apperson